RxVantage External User Login
User Authentication with your company identity (IDMS) server
In this type of authentication, you will first authenticate the user on your site, then call the pertinent endpoints to complete authentication process with RxVantage. A general workflow looks like the following:
Step 1: Have a the user login in on your site.
Step 2: Construct and sign a user JWT token that will identify the user from your system.
The signing secret must be agreed upon first so that RxVantage can trust the token passed from your site. A typical token would look like the example below. This is the token that you will pass in Step 3.
{
  "iss": "https://yourdomain.com",
  "azp": "630852513090-30qp4ce770njffu8p5fgg83jfagccdu7.apps.yourdomain.com",
  "aud": "630852513090-30qp4ce770njffu8p5fgg83jfagccdu7.apps.yourdomain.com",
  "sub": "100428611898957129045",
  "hd": "yourdomain.com",
  "email": "user@yourdomain.com",
  "name": "User Firstname User Lastname",
  "given_name": "User Firstname",
  "family_name": "User Lirstname",
  "iat": 1737520960,
  "exp": 1737524560
}
This is a sample JWT token created by you that can be passed into RxVantage
Step 3: Call RxVantage External Login Endpoint and send the JWT constructed in Step 2 above.
Step 4 After successful login / registration with RxVantage, you will receive a callback to the URL passed in Step 3 with the an RxVantage authorization code.
Step 5 Post the RxVantage authorization code received in Step 4 to the External Login Callback Endpoint to exchange it for an RxVantage user JWT token.
Step 6 Once you have an RxVantage user JWT token, you will use that as a Bearer token in subsequent API request. The Bearer token should be placed in the header as an Authorization.
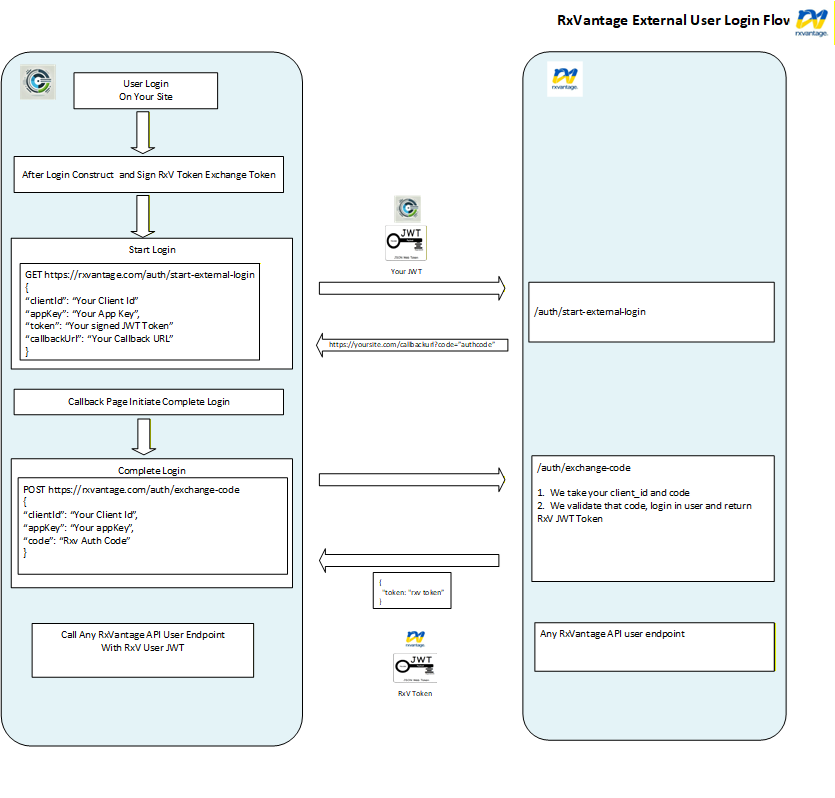
This is a diagram of the external user login flow: